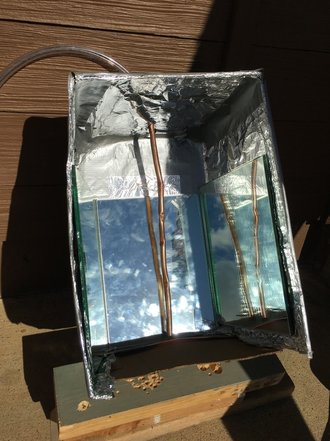
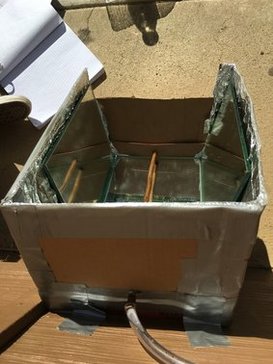
Solar Water HeaterTo help our class understand the different methods of transferring energy to create heat, we created solar water heaters. These devices use solar energy to heat water.
To create our solar water heater, we used a pizza boxThe replaceable plastic bottle allowed water to flow through a plastic tube to a rectangular box. The container had a single copper pipe to conduct sunlight for heat to the water inside. The aluminum foil on the bottle's interior reflected the light into the pipe. The mirrors were placed at a slight angle to magnify the light onto the copper pipe. The heater we created had several problems. The piping leaked constantly, resulting in our group attempting to seal the copper with tape and clay. However, we were rather unsuccessful and only heated about five milliliters of water 8 degrees (Celsius). Compared to other groups, our group's device was significantly less efficient when comparing heat efficiency. My solar heater only gained 167.44 Joules in heat, while other groups' heat gain got up to 35,000 Joules. I believe this is due to our small water container, light colored copper pipe, and leaking piping. |
|
Heat
n.- the state of a body perceived as having or generating a relatively high degree of warmth
Heat is the transfer of energy from a hotter substance to a cooler substance. Molecular motion is determined by the temperature of an object, a higher temperature resulting in high energy and lower temperature leading to slower molecular movement. Basically, the higher a temperature is, the higher the heat and energy in an object is in terms of molecular movement. This also results in the volume of the object increasing, and the density and pressure dropping as the molecules expand with the heat.
Heat transfers are the transfer of kinetic energy through vibrations between molecules. Good conductors, objects that transfer heat faster (feel colder or hotter), have high thermal conductivity. Insulation (insulators) absorb heat and don't conduct well with high thermal conductivity.
Specific heat capacity is the measure of how much heat an object will hold. With a high specific heat capacity, the substance heats and cools slowly, but fluctuates much more with a low specific heat capacity. For instance, the specific heat capacity of water is 1 calories per gram degree Celsius, a rather high measure.
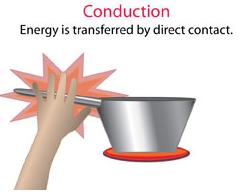
ConductionHeat transfer through material
(solids) |
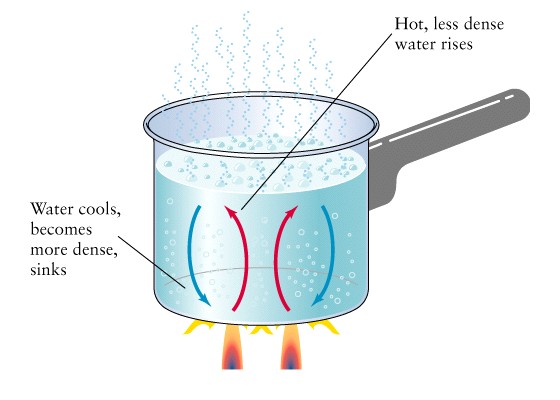
ConvectionHeat transfer through liquids or gases
|

RadiationHeat transfer using rays/waves (no medium required)
|
DAYLIGHTING TECHNIQUES
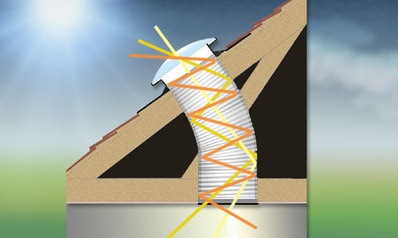
Solar TubesCylindrical dome with reflective tubing on the interior that is installed into building's roof to bounce natural light back and forth into house
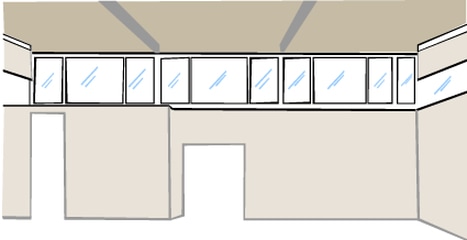
Clerestory WindowsA high section of wall that contains windows near the ceiling to reflect light off the opposite wall and onto the floor
|
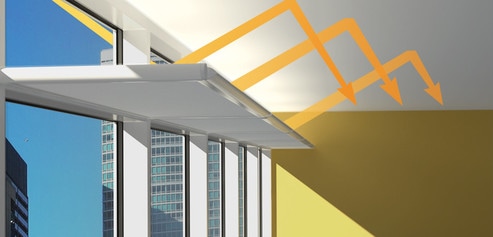
Light ShelvesAn extension from a window that reflects natural light up into house's ceiling and back onto floor
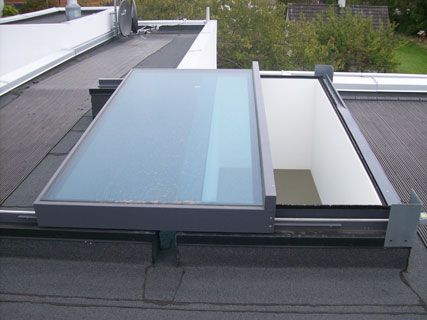
SkylightsA glass opening in the roof or ceiling to allow natural light to filter in
|
The angle of natural light in different seasons and times of day influences the placement of windows. Because the Sun rises in the East and sets in the West, most architects place windows along the South side of the building to filter in as much sunlight as possible. The seasons' effect on the Sun's angle towards the house also is a significant factor of the design. With the Sun having a much steeper path in the summer compared to the winter's low path of light, windows are typically placed to allow much more direct light in during the winter and indirect during the summer. This placement allows the house to remain at a rather constant temperature naturally. White paint also allows more sunlight to be reflected off the walls to keep the house bright.
EXPERIMENTAL HOUSE
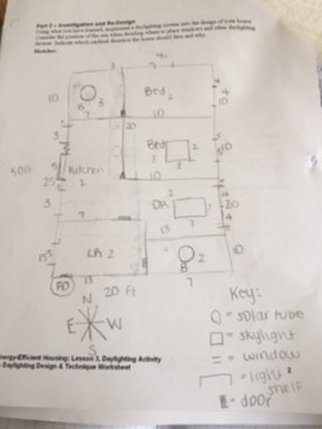
For this project, we built a model, thousand square foot house out of cardboard and tape to determine the percentage of sun that reached each room at different points of the year. After learning about different daylighting systems, we chose what we thought were the optimal position types and locations of these devices on our house to have the most natural light. With the floor plan we had, we decided on only using windows, solar tubes, skylights, and a light shelf. We researched the different methods of focusing sunlight into our house to attain the most natural lighting, finding a blueprint that was logical and simple on paper. For the living room, up to 50% of natural light got into the room during the winter simulation, but absolutely no light was in the room all throughout the summer. The room is on the south side of the house, allowing more light to enter the living area during the winter, but not as much during the summer, especially with one window only on the east side. The first bathroom adjoining the living room got very little light in general, the most only being 10% in the summer mornings and afternoons. The room only has one solar tube, allowing only the light above the house to enter the room, making it difficult for much natural sunlight to enter the bathroom. The rather large, open concept dining room and kitchen was the one room in the house that got a constant amount of light at about 35% year round. The room was central and stretched from one side of the house to the other, allowing light from the windows along the east and west walls to filter into one room. The first bedroom got no light all throughout the winter, but got an average of about 35% in the summer. The room is on the west side of the house, the windows along the west and north wall blocked from the sun during the winter, but filled with light during the summer. The second bedroom had the same problem of no sunlight during the winter, but an average of approximately 30% in the summer. The room was also on the west side of the house with windows only along the west wall, slightly smaller than the first, the master bedroom, resulting in less natural light. However, we added a small skylight to make up for the smaller window, but the light from directly overhead the room was the only light that could enter. The second bathroom only got 20% in the winter evenings and about 15% later in summer days, getting none in the morning. The room only had a solar tube with no windows, allowing only sunlight overhead into the bathroom. Overall, our house wasn’t as successful as anticipated due to the model scale and lack of larger windows, and needs to be slightly modified for improvement, but filtered a decent amount of natural light into the house!
MATERIALS TESTING LAB
To test each building material that we would be using for the house, the class split into groups for all different parts of the building (walls, flooring, roofing, paint, etc.). Our goal was to research each substances' reaction to the transfer of heat through conduction, convection, radiation, conduction, insulation, and/or reflection. I worked to determine the best insulation material through a series of experiments.
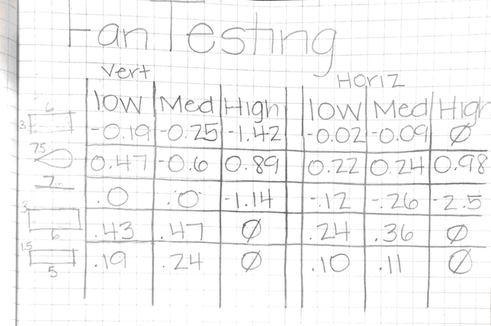
In this experiment, we determined that fiberglass is the best material for insulation in a building. Our group tested three insulation types of spray foam, rigid foam, and fiberglass. We took a 7”x10” cardboard box and lined the bottom, side and top walls with the material and made the container as airtight as possible. To measure the insulation, we heated a copper pipe for fifteen minutes at 350* in the oven to heat it to a varying temperature. The pipe never had the same initial temperature for whatever reason, having a difference of about forty degrees. We then took the copper from the oven and tried to put the pipe in the insulated box as quickly as possible, placing the hot metal on a small, wood plank to avoid burning the interior. Using duct tape, the container was sealed and placed outside under the building’s overhang to protect the insulation from the rain for ten minutes. The box was then opened and the copper pipe was again measured for the final temperature, which only ranged about seven degrees for the three sets of tests. For the spray foam, the copper came out of the oven at 80.6* and dropped to 25* after being outside, proving to not have worked very well at keeping the hot temperature. The spray foam was already dried and did not nearly fill in the box, misshapen and filled with gaps. This allowed for a lot of the air to be lost easily, allowing the majority of heat to escape during the ten minutes outside. The rigid foam insulated decently, the copper pipe decreasing from 64.8* to 27.1*. This type of substance did not seem to work well with a thin wall of cardboard, but was thick and supposed to keep the heat inside well. We believe that the foam was unsuccessful due to being semi-permeable, but are not exactly sure why the material was more insulating. The last test was of the fiberglass, which was the most effective material for keeping the heat inside the container, measuring from 104.6* to 32.9*. We think that fiberglass was the best insulator, because the substance had the ability and thickness to be layered easily, keeping the heat inside. However, the initial temperature of this copper pipe was well higher than the first two experiments. Our group still does not have any idea why the pipe fluctuated so drastically in temperature, but we did have the data to prove which one of the three materials kept the temperature hot. Therefore, we can conclude that fiberglass is the best insulator option.
To examine this data, I created several graphs to depict how up to ten minutes under a heat lamp affects different building materials in terms of temperature fluctuation. This information showed that if the temperature increased quickly, that material has a low specific heat capacity, but if the temperature raised slowly, the object has a high specific capacity.
There were several possible errors in this experiment that we, as a class, could have easily made with the equipment. With the heat lamps, the energy generated by the light bulb could have been unequal, had no warm up or cool down time to keep a constant temperature for each test, and could have been positioned at varying heights. The heat lamps were rather inconsistent in multiple aspects, leading to variation in results and incorrect conclusions. The actual materials were also a problem, considering the difference in surface area and volumes and the measuring of those substances’ temperatures. The insulation tests were another issue, since it was very difficult to replicate a house’s way of keeping constant temperature. Air gaps in the container and varying starting temperatures for the piece of copper used to measure the change in heat were major conundrums that we did not manage to fix, and definitely impacted our data.
To improve this experiment, many of these problems could be corrected with simple, yet effective changes. For the initial temperatures of the heat lamps and materials to all be the same, we would add a cooling period to allow all starting values to be equal throughout the entire process. We would also like to have longer and more time intervals for the materials to be under the heat lamps, allowing us to collect more accurate and realistic data. As far as making insulation as close to an actual building’s design, we would create airtight containers to eliminate the problem of escaping heat and unnecessary decrease in temperature.
This project inspired ideas for future investigations related to this experiment. As we brainstormed, we thought about testing the stability of the building materials and the time needed for erosion and signs of crumbling, different substances altogether, building model houses to analyze the building supplies in lifelike circumstances, and how the different components react to weather (water and moisture proof).
| materials_heat_lab_data_6_7th_2017.pdf |
| house_materials_vs._temperature.pdf |
TINY HOUSE
All of this work and testing has prepared us to design a functional and realistic tiny house. Our group planned a fully contained, passive solar structure that is cost and energy efficient. Using all of the information we have learned over the course of this project, we started the process by brainstorming what exactly we wanted for the tiny house, in terms of its location, dimensions, and key features. We then took our basic idea and blueprinted the layout and exterior and continued the project by finding the necessary materials, as well as creating a scale model of the house.
WIND TURBINES
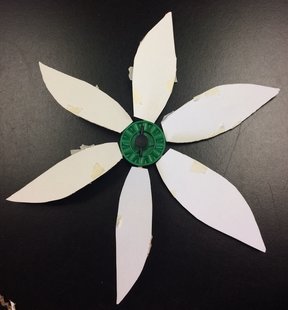
To study windmills and the energy they create, we created several wind turbines out of many materials and different designs. We tested five fan designs to study how each model reacted to three layers of wind on a vertical and horizontal axis, the two lowest settings on a fan with the third and highest level on the leaf blower. All designs had six blades, leaving our group to test which shape and size of the model worked the best.
For the first design, the blades were rectangular, 6"x3" card stock tilted at a 45 degree angle.
The second was also card stock, but in a petal-like shape that was 7.5" long at a 30 degree angle.
Our third blade was a 7" long card stock that was at 60 degrees.
The fourth was a 6"x3" cardboard blade at no angle.
Our last design was a 1.5"x5" blade that was also at no angle.
We found the second design, the petal-shaped, 7.5" long blades to be the most effective in all three wind conditions.
REFLECTION
This project was definitely one with ups and downs, but turned out to be rather successful in the end! As a group, our team dynamic definitely was unpredictable. In the beginning of the entire process, we were working very well together, communicating with little trouble and all seeming to have rather similar ideas. This led to a great learning experience with the solar water heater, as we continued to persevere through our difficulty with the device. The experimental house also went smoothly, with all team members participating and helping one another. However, the actual tiny house was when problems arose. Throughout the time we had been together, my group members, including myself, all had ideas they personally wanted to stick to and see through. This became a prevalent issue with the design of an actual house, considering there was very little opportunity for all desires to be met. With some feeling their voices were not being heard, the group began splitting apart and simply did not keep one another informed of what exactly each person was doing. We ended up having to seriously crack down on the work that needed to be done extremely last-minute, leaving everyone stressed and not producing our best work. I made some serious design errors, including not having any windows on the south wall and using cement blocks as a foundation.
With this project, I think communication and distribution of work are the two most important aspects. I felt that in the beginning, we were doing amazing, with high productivity and inclusion of all work. Next project, I would love to keep this going throughout the entire time with my group by keeping together and being honest with one another about how we were feeling. Individually, I felt I had to work on this design a lot outside of class because of our lack of communication and did not enjoy the last week or so of working on the tiny house. I definitely need to make sure this does not happen again by being vocal about what I need help on and what needs to be done. I also need to allow myself to work through the hard times and be patient with myself and my group. I did end up contributing a lot to this project and felt that this was the most productive I have ever been. Overall, this project served as a great learning opportunity for me!
With this project, I think communication and distribution of work are the two most important aspects. I felt that in the beginning, we were doing amazing, with high productivity and inclusion of all work. Next project, I would love to keep this going throughout the entire time with my group by keeping together and being honest with one another about how we were feeling. Individually, I felt I had to work on this design a lot outside of class because of our lack of communication and did not enjoy the last week or so of working on the tiny house. I definitely need to make sure this does not happen again by being vocal about what I need help on and what needs to be done. I also need to allow myself to work through the hard times and be patient with myself and my group. I did end up contributing a lot to this project and felt that this was the most productive I have ever been. Overall, this project served as a great learning opportunity for me!
